3.14 ü@Light and electron microscopy of archegonia
embedded with epoxy resin
Takashi Murata and Naomi Sumikawa
In chapter 3.4, we
described confocal microscopy of eggs and young embryos in cleared archegonia.
Although the method is excellent for observation of tissue organization,
subcellular structures are lost during clearing of tissues. Sectioning followed
by light and electron microscopy is a useful method to visualize subcellular
structures when good molecular probes for such structures are not available. In
this section, we describe methods for light and electron microscopy of
archegonia embedded with a low-viscosity epoxy resin. This method should be applicable
for protonemata and other tissue with minor modification of fixative.
1 Fixation and Embedding
1) Preparation
of chemicals
WARNING:
The chemicals below are hazardous. Use gloves. For detail of chemicals, see
appendix.
Fixative
5
% glutaraldehyde in 0.05 M sodium phosphate buffer, pH6.8.ü@ Prepare just before use.
Post-fixative
2 % osmium tetroxide in
dH2O.ü@ Handle in a hood
because the vapor is extremely toxic. You can purchase the solution in
ampoules. Use immediately after opening the ampoule. Instead, you can prepare
the solution from osmium tetroxide and dH2O. The fresh solution
should be clear (light yellow). The exhausted solution is black. Do not use the
exhausted solution!
Epoxy
resin mixture (Quetol 651 mixture by Nissin EM, Tokyo)
Prepare the mixture without accelerator. Add accelerator
upon needed. Pot life of the mixture with accelerator is about 1 day.
Recipe
for 50 ml mixture (without accelerator)
Quetol
651 (Nissin EM) 18.87 g
NSA
30.18 g
MNA
3.31 g
For 50 ml mixture, add
850 ml accelerator (DMP-30).ü@ Mix thoroughly
after adding the accelerator.
2) Protocols
I. Pore the
fixative to a plastic Petri dish.ü@
Transfer a colony of P. patens to the dish.ü@ Cut the colony with a razor blade or a
surgical knife into small pieces (less than 5 mm square: as small as possible).ü@ After that, transfer the tissues into a
glass vial with fixative.
II. Incubate the
vial at room temperature for 5 h.
III.
Wash the tissues with glutaraldehyde-free sodium phosphate
buffer by three changes of solutions.ü@
An interval of each change is 10 min.
IV.
Incubate with post-fixative (2 % OsO4 in dH2O)
at room temperature for 2 h.ü@ Handle in
a hood and use gloves.
V. Rinse with
0.05 M sodium phosphate buffer.
VI.
Dehydration with graded acetone series.
25% acetoneü@ü@ü@ü@ 15-30 min, on ice
50% acetoneü@ü@ü@ü@ 15-30 min, on ice
75% acetoneü@ü@ü@ü@ 4ºC, overnight
99.5% acetoneü@ü@ü@ 15-30 min, on ice
100% acetone (dehydrated
acetone)ü@ü@ 15 min at room temperature,
twice.
VII. Infiltration with
resin (gently shake on rotator).
12.5 % resin (no
accelerator) in deh. acetoneü@ü@ü@ü@ü@ R.T.
for 2 h
25 % resin (no
accelerator) in deh. acetoneü@ü@ü@ü@ü@ü@ R.T.
for 2 h
50 % resin (no
accelerator) in deh. acetoneü@ü@ü@ü@ü@ü@ R.T.
for 2 h
75 % resin (no
accelerator) in deh. acetoneü@ü@ü@ü@ü@ü@ R.T.
for 2 h
100 % resin (no
accelerator)ü@ü@ü@ü@ü@ü@ü@ü@ü@ü@ü@ü@ü@ü@ü@ü@ü@ R.T.
overnight
100 % resin (plus
accelerator)ü@ü@ü@ü@ü@ü@ü@ü@ü@ü@ü@ü@ü@ü@ü@ü@ R.T. for 4
h, twice
VIII. Transfer the
infiltrated tissue to a mold.ü@
Polymerize the resin at 60ºC for more
than 1 day in an oven. Store the polymerized resin blocks until sectioning at
room temperature under dehydrated condition.
(Continue to the next
page)
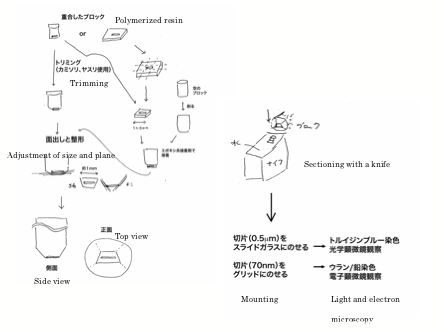
2 Sectioning and light microscopy
Overview
of sectioning is shown in the drawing below (in Japanese).
1)
Preparation of grids with formvar membrane (for electron microscopy only)
(Because
formvar membrane becomes hydrophobic with time, the grids should be prepared on
the day or one day before the sectioning.)
Wipe a glass slide with
a dry lens paper.ü@ Dip the slide into
0.5 % formvar in chloroform (or ethylene dichloride).ü@ Bring the glass up slowly into the air.ü@ Dry the slide at room temperature for approx. 2 min.ü@ Cut a formvar layer with a razor blade on
four sides of the glass.ü@ Dip slowly the
glass into dH2O, which is filled in a 500 ml beaker or equivalent,
so that a formvar layer is removed from the glass on the surface of water as a membrane.ü@ Because some glass slides are sticky
(depends on a lot of glasses), choose good glass slides before
preparation.ü@ Color of formvar membrane
is correlated with thickness of the membrane (interference color).ü@ Silver membrane is best for use.ü@ Gold or purple membrane is too thick, and
dark gray membrane is too thin.ü@ Faster
up-speed from formvar solution will result thicker formvar membrane.ü@ Because color of membrane varies even in a
single membrane, put the grids onto better (that is, silver) areas of a
membrane.ü@ After putting grids, put a
piece of Parafilm onto the membrane and remove the membrane from a surface of
water.ü@ Dry the membrane with grids on
Parafilm and store until use in a clean Petri dish.
2) Sectioning
and light microscopy
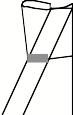
I.
Trim a block head into a 0.5 mm square.ü@ Use a file for rough cut (first step).ü@ For finishing use, use a razor blade under
binocular microscope.
II.
Cut the block head with a glass knife on a ultramicrotome
until surface of a tissue appears.
III.
Upon encountering with the surface of a tissue, change the
used glass knife to a diamond knife (for light microscopic sections) or a new
glass knife with a boat.ü@ Make 0.5 mm
sections by the knife.ü@ Transfer the
sections from a boat to a APS (silane)-coated glass slide with a wire
loop.ü@ Observe the sections after
staining with toluidine blue.ü@ Repeat
sectioning and observation, and stop sectioning when desired area will appear
after a few sections.
- Toluidine blue
staining -
Stain: 1 % toluidine
blue in 0.1 M sodium phosphate buffer (pH7.0)
or
0.5 % toluidine blue in
2 % sodium borate
Drop the stain onto the
sections, and incubate at room temperature for a few minutes followed by dH2O
wash.ü@ If staining is weak, heat the
preparation on a heat plate for several ten seconds.
The staining will be
fade after mounting with organic solvent-dissolved mounting medium.ü@ Stained sections should be stored before
mounting.
3) Sectioning for
electron microscopy.
I. Change the knife to a diamond knife for electron
microscopic sections (or freshly prepared good glass knife with a boat).ü@ Make 70 nm sections.ü@ Expand sections by chloroform vapor (by a
toothpick dipped into chloroform solution).
II. Pick up the sections onto the grids with formvar
membrane.ü@ Store in a grid case until
staining.
How to make a glass
knife by glass knife maker (Messer type).
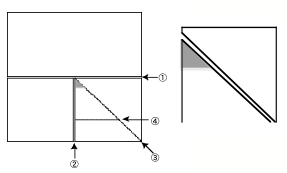
Cut the square glass as numbered.ü@ Do not touch the gray area in the left and
center schemes, because the area is used as a boat.ü@ Finally, make a boat with an adhesive tape (right).
3. Uranyl
acetate and lead citrate double staining
1) Chemicals
1
% uranyl acetate in dH2O or in 70% methanol
Aqueous solution is the
most commonly used for uranyl acetate staining.ü@ However, the staining is sometimes weak for some low-viscosity resin
or for thick sections. In such case, 70 % methanol solution gives stronger
staining, but the solution easily precipitate (especially under
illumination).ü@ The methanol solution
should be stored in the dark at –20ºC.
Laynoldüfs
lead citrate
Dissolve 1.33 g of lead
nitrate and 1.76 g of sodium citrate into 30 ml of distilled water.ü@ Shake vigorously for 1 minute, and then keep
at room temperature with shaking at a few minutes intervals.ü@ After 30 minutes, add 8 ml of 1 N NaOH.ü@ Confirm that the solution become clear.ü@ Add distill water to 50 ml of total
volume.ü@ Seal tightly with Parafilm
(avoid contact with carbon dioxide in air) and store at 4ºC.
2) Protocols
I. If you have
many grids, attach the grids onto a specially designed stick bar
(Grid-stick).ü@ For use of Grid-stick,
sections should be upside of the grid.
II. Drop uranyl
acetate solution onto a sheet of parafilm spread in a Petri dish (covered with
alminium foil).ü@ Put the grids onto the
uranyl acetate drops, with section side down.ü@
Incubate the grids in the Petri dish for 3-10 min at room temperature.
III.
Wash the grids with distilled water.
IV.
Drop lead citrate solution onto a sheet of parafilm spread
in a Petri dish (filled with NaOH).ü@
Incubate the grids with lead citrate solution for 3-5 min.
V. Wash with
distilled water.
VI.
Air dry and store until microscopy.
4.
Microscopy
Please
contact members of EM facility of your institute or university.ü@ Operation of electron microscope should be
learned by skilled persons, or by manufacturerüfs training course.
Appendix. ü@Chemicals needed.
For fixation and
embedding
0.2 M sodium
phosphate buffer, pH 6.8 and pH 7.0.ü@
Prepare from NaH2PO4 and Na2HPO4.
25 %
glutaraldehyde solution (EM grade)
2 % osmium
tetroxide in water (we recommend package in ampoules)
Quetol 651
resin kit (Nissin EM, Tokyo)
Acetone (99.5
%)
Acetone,
dehydrated (commercially available for organic chemical synthesis)
For sectioning
0.5 % formvar
in chloroform (or ethylene dichloride)
Grids
Toluidine
blue
Glass slides
(APS coated and uncoated)
Mounting medium
Chloroform
For
staining with heavy metals (for EM)
Lead nitrate
Sodium
citrate
Uranyl
acetate